
How to photograph the northern lights in Iceland
“What settings should I use to photograph the aurora?” is a question often asked by new aurora photographers. Unfortunately, there is no easy answer to this question, since auroras continuously change in brightness and structure (often within seconds) over the course of an evening. Therefore, aurora photography in Iceland requires constant alterations to camera settings.
An investment of time is required to learn how to adjust camera settings responsively during night photography. Therefore, I have aimed the following guidance mostly at photographers who already understand basic camera operation. The information is based purely on my own experience of what has (and hasn’t) worked for me for aurora photography in Iceland. Other people may have different opinions, and the best settings will also vary according to the specifications of your own equipment. However, the information below should provide a good basis from which to get started. If you require more specific expert advice on aurora photography then I recommend booking a professional aurora tour in Iceland. A quick internet search will reveal tour sites. They should be able to offer one-to-one tuition for you. For more general guidance on aurora-watching in Iceland please visit practical advice on how to see the northern lights in Iceland.
Click on one of the questions below to find the relevant information:
Photographing the aurora in Iceland.
What equipment should I use?
- Camera body: Most people will recommend that you use a digital single lens reflex (DSLR) camera body. I currently use a Canon 5D III for my aurora photography, but this is now an older model and I am looking at updating it. Recent developments in mirrorless camera bodies such as the Sony a7 range are also popular with professional aurora photographers. There are numerous options, and generally you will get exactly what you pay for in terms of quality.
- Compact cameras: Technology is advancing continuously, and some high-end bridge and compact cameras are also now suitable for photographing the aurora. These have the advantage of being small (some are pocket-sized) with built-in lenses, and thus may suit people who are only photographing auroras during a "one off" holiday vacation. Please see my review of the Sony RX100IV for aurora photography for examples of settings and images from one such small camera.
- Mobile phones: People increasingly ask whether they can photograph the aurora using their iphone or android phone or similar. Any app with an option for long exposures should help with taking auroras on a phone. You will certainly also need a tripod, because hand-holding a camera for even a couple of seconds will result in tiny movements that will cause the stars and other features to blur. However, my advice ends there, because I would never personally opt to use a phone to photograph the aurora due to the comparatively low quality of the resulting images.
- Mobile phones: People increasingly ask whether they can photograph the aurora using their iphone or android phone or similar. Any app with an option for long exposures should help with taking auroras on a phone. You will certainly also need a tripod, because hand-holding a camera for even a couple of seconds will result in tiny movements that will cause the stars and other features to blur. However, my advice ends there, because I would never personally opt to use a phone to photograph the aurora due to the comparatively low quality of the resulting images.
- Camera lens: There are multiple options for lenses, but the most crucial component is to use a lens with a wide aperture to let in the maximum amount of light possible. In photographic terms, a wide aperture translates into a small f-stop value. Generally, for the aurora it is recommended to use a lens of f/2.8 or smaller (or, better still, a f/2.0 or f/1.8). You also need the lens to be sufficiently wide to capture a large amount of sky, and this generally means 24 mm or less. This is one important aspect that differs from photographing auroras at mid-latitudes (such as the UK) where it is usually located lower in the sky along the northern horizon, and a narrower (or zoom) lens is adequate. In Iceland the aurora is frequently high in the sky and expansive, and a wide-angle lens is essential if you would like to capture foreground as well as the aurora. The wide lens I personally use is a Samyang (also sold as Rokinon) 14 mm f/2.8 lens which is a popular and relatively-cheap lens for night photography. However, I frequently find that even this is not as wide-angle as I would like during strong aurora in Iceland!
- Tripod: A sturdy tripod is essential. Aurora photography requires single long exposures of several seconds duration, which means that the camera must be held completely still in order to avoid blur. I recommend getting the heaviest/sturdiest tripod that you can manage, especially when photographing on windy nights. Make sure that you have a quick release plate attached to the underside of your camera that fits the tripod head you are using. If your tripod has unprotected metal legs then I recommend attaching some foam pieces to the legs for carrying purposes, as gripping cold metal can make your hands very cold, very fast.
- Ball head: In Iceland the aurora can sometimes move across the sky very rapidly, with the action changing between different directions and height in the sky. It saves a lot of frustration to have a good ball head fitted to your tripod that will allow you to move the camera around quickly in horizontal and vertical directions to keep up with the action. An L-shaped bracket fitted to your camera will also allow you to switch easily between portrait and landscape orientation, which I find to be essential during a strong aurora storm when the sky is changing rapidly. It is sensible to practice with ball heads and brackets so that you are familiar with the equipment and able to manoeuvre them in the dark.
- Shutter release: If you operate your camera shutter using your hand, you will inevitably introduce some shake into the process which will reduce the sharpness of your image. Consequently, most night photographers use a shutter release. I have used a variety of third-party shutter releases purchased cheaply off Amazon, and they have all done the job adequately so you do not necessarily need to spend a lot of money on this. Both wired and wireless will work, but latterly I have used a wireless release so that I have the option to operate the camera from inside a car if I need to take a break to warm-up. The absence of the external wire also reduces potential shake due to wind.
- Head torch: This is an essential item if you are trying to alter settings in the dark and for general safety while moving around at night. I always have two head torches with me, as it is not uncommon for me to misplace one. The type with a red light will not impair your night vision like a white light does.

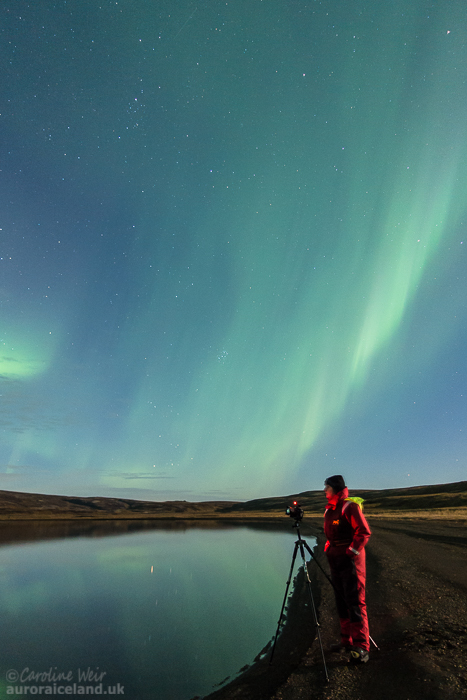
My typical camera setup when photographing auroras.
What else should I remember while setting up?
I strongly recommend the following:
Consider removing the neck strap (and anything else loose) from your camera, as it will move around in the wind and may cause shake that will blur your images.
Cover the view finder to reduce light getting into the camera. Many DSLRs provide a handy rubber piece to fit over the viewfinder. Don't forget to attach it! Or just use some tape.
Remove any filters from the front of your lens. They will cause horrible distortions (rings) on your images.
Dim the brightness of the LCD screen on the back of your camera. This will both protect your night vision and help you to prevent under-exposure when gauging image brightness from the back of the camera (though I strongly recommend learning about, and using, histograms to evaluate your exposures in the field).
What camera settings should I use for aurora?
You will receive different answers on this depending on: (1) who you ask; (2) what equipment they use (which probably isn't the same as yours); and (3) the circumstances in which they are used to photographing the aurora (someone who photographs distant auroras in the UK will use different settings from those photographing strong, overhead, auroras in Iceland or Norway). Additionally, when shooting auroras at high latitudes then you need to be prepared to alter your settings multiple times over the course of a substorm, and consequently, no single group of settings is universally-appropriate for all auroras. Practice makes perfect and the exact settings you select will also depend on your personal preferences for striking the balance between: (1) freezing the motion of active auroras; and (2) achieving a well-exposed foreground in your image. In practice, there is a trade-off between these two points, unless you are fortunate to have high-end camera equipment allowing lots of light in so that you can do both simultaneously. The following information is intended as a starting point only.
- Set your camera to Bulb mode or to Manual mode. If you use Bulb mode then you will also need to use a shutter release. If you use Manual mode then you could use a shutter release or alternatively implement the 2 sec delay timer on your camera to open the shutter in order to reduce shake. The latter is only really viable for slow-moving auroras where you don't need to alter your exposure time much between shots. However, in Iceland I constantly alter exposure between 1 and 22 seconds depending on activity, and having to keep changing the camera settings to achieve this would definitely result in frustration and missed shots. I use Bulb mode and a wireless shutter release which gives me total flexibility to alter exposure duration without having to touch the camera body.
- Make sure that your lens is set to Manual focus rather than Autofocus. Focus your lens to infinity. There are lots of websites explaining how to achieve this, but a good method is to zoom in as far as possible on stars or the moon and then adjust the focus until the target appears sharp. Once focus is achieved, lock your lens or tape it in place so that you do not accidentally move it. Achieving a good focus with your lens is one of the most challenging aspects of night photography and something that it is wise to practice. No-one wants their aurora pictures ruined by blurry stars!

After shooting some lovely aurora with reflections at a lake, I was really disappointed to get home and find that all of the stars were a little out of focus. A hard lesson learnt. Make sure you focus your camera properly and tape the lens in place!
- Set your lens to its widest aperture (equivalent to the lowest f-value).
- Set your camera to take images in RAW format. RAW is essential in order to maximise the outputs from any image processing. I take all of my images in RAW + jpeg, so that there is also something to view on the camera display in the field in order to adjust composition as necessary.
- Set your ISO to something between 800 and 6400. I usually start (and often stay) at 1600. I have found this to be a good general value for my particular camera (Canon 5D III), but different camera models vary in their performance at particular ISO values (i.e. ISO variance). You want a fast (high) ISO to optimise exposure, but you don't want it to be so fast that it incurs excess "noise" (i.e. image grain). This is a trade-off and you will have to practice and see what works best for your camera in different conditions. I strongly recommend that you do some reading on the relationships between ISO, exposure times and subject motion in order to understand how these factors relate to one another, and be able to adjust the settings according to your desired image type and prevailing field conditions.
- If your camera has an in-built spirit level, use it to make sure that your composition is straight. Getting a composition correct is challenging at night, and may require several adjustments. The image can, of course, be straightened during processing, but getting it correct in camera will reduce the need to crop and thus optimise the final image quality.
- In camera noise reduction. If you have Long Exposure Noise Reduction (LENR) set to ON then it will reduce noise on your image (specifically the hot pixels caused by warm sensors), but at the cost of doubling the processing time for your image. That means that after you take a 15 second image then you will have to wait another 15 seconds for the noise reduction process to complete before you can take the next image. Some people use LENR and some do not, opting instead to use processing to remove image noise. I do currently use it, but it has been frustrating at times when the aurora is moving fast and I have to wait to complete the LENR before being able to take the next picture. So, this is a question of preference...
- Take the picture! Your exposure time will depend on both the type of aurora and the prevailing light conditions (and on your other settings, such as ISO). Generally, around 15 seconds is a good starting point for average auroras in Iceland (noting that I like to "expose to the right" for foreground brightness - you could capture aurora perfectly-well with a much shorter exposure than this, or you could expose two images separately for sky and foreground and then blend the images during processing). I often shoot aurora arcs (which are slow-moving) at around 20 seconds exposure on dark nights with no moon, in order to get the best-exposed foreground possible. On a bright night with lots of moonlight, this exposure might be reduced to 12 seconds or less. For a fast-moving aurora, exposure times of a maximum 5 seconds are better to freeze the motion, but this comes at the expense of an overall reduction in image brightness and quality. In other words, achieving a good exposure requires a lot of consideration and adjustment in the field. Serious aurora photographers should certainly learn how to use the histogram associated with each image in order to judge exposure. I also set my camera to highlight any over-exposed parts of the image as flashing areas on the screen during the image review, so that I can see when I need to reduce the exposure time (or the ISO). During especially bright auroras the use of your standard aurora settings might cause over-exposure. This can also be a problem with clouds lit by the moon or from cars, cities and other light pollution.
How should I process my aurora images?
The answer is, as little as is necessary. I use Lightroom to process my own images, and in most cases I limit the adjustments to (sometimes) correcting the white balance (WB), reducing noise, and adding small amounts of saturation, clarity and vibrance. The aim should always be to get as much correct "in camera" as possible, and limit the tweaks needed for processing. I shoot all of my RAW images on "auto WB". Sometimes during processing I adjust the WB slightly, in order to correct the foreground area of the image with regard to light pollution. This is because artificial light often makes clouds, snow and vegetation appear a more orange colour than they actually were when the image was taken.
Personally, I like my aurora photographs to represent as closely as possible what I saw with my naked eye, while accepting that a camera will always capture a more intense overall appearance due to its longer exposure time. One limitation in this regard, is that humans vary in how sensitive their eyes are at perceiving the colours of the aurora. Thus, while I could process a photograph to look similar to what I saw with my eyes, this may not reflect what the person standing next to me saw with their own eyes.
And finally...
Good luck, be safe, and remember to look up from your camera regularly and watch the aurora with your eyes. This is particularly important when the aurora is dancing across the sky - the photograph will never be as good as what you see and keep forever in your memory, trust me.


(c) auroraiceland.uk 2020